Tuesday, February 3, 2015

HDPE Electrofusion Process


A number of locations throughout the new irrigation system call for electrofusion branch saddles rather than a butt fusion tee.  An example of one of these locations would be a feed for a tee complex.  Electrofusion saddles are used in these locations to create a branch off of the mainline without cutting the pipe.  This cuts down on the number of welds needed to create each branch.  

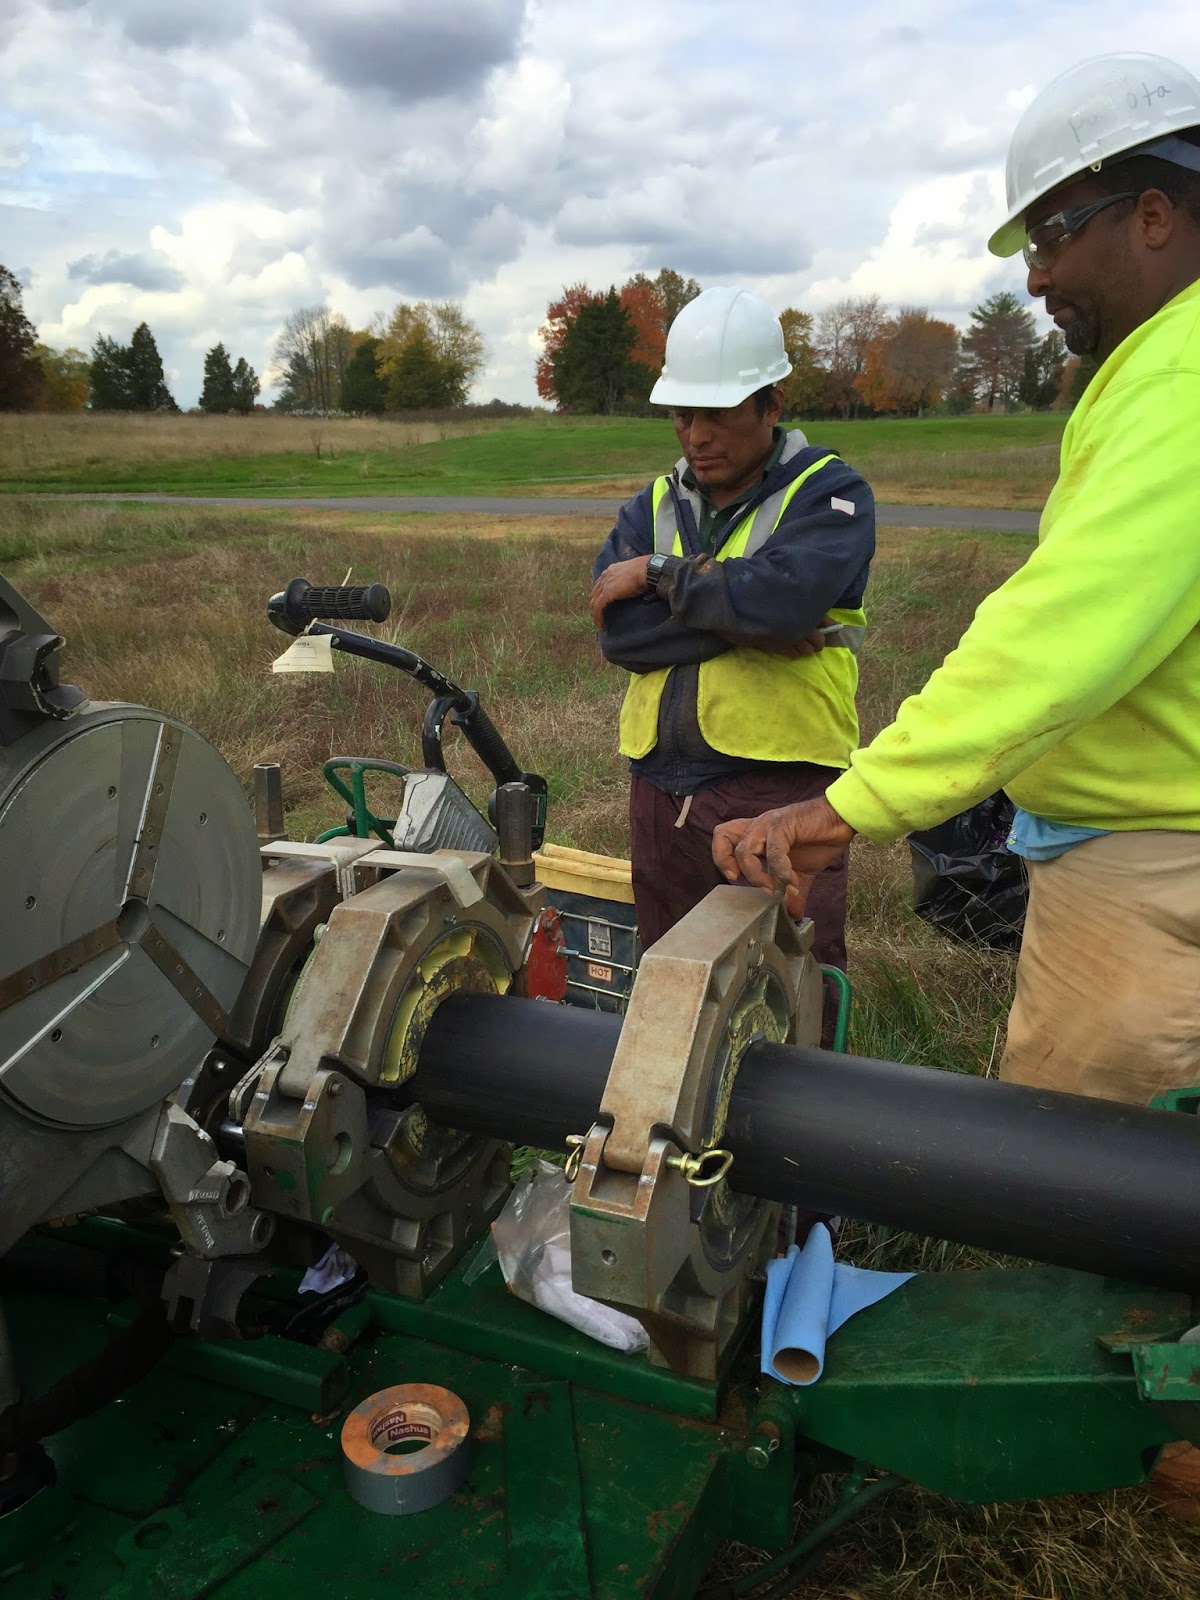
Electrofusion is a method of joining HDPE pipe with special fittings that contain built in electric heating coils which are used to weld the joint together. A Friatec Friamat Fusion Unit is used to electrically heat the heating coils. 

Friamat Fusion Unit

The process of electrofusion welding begins by locating where the fitting is to be welded.  This location is then marked and the fitting is removed.  The surface of the pipe is now scored using a special scraper, exposing virgin material.  This process is key for proper electrofusion.  
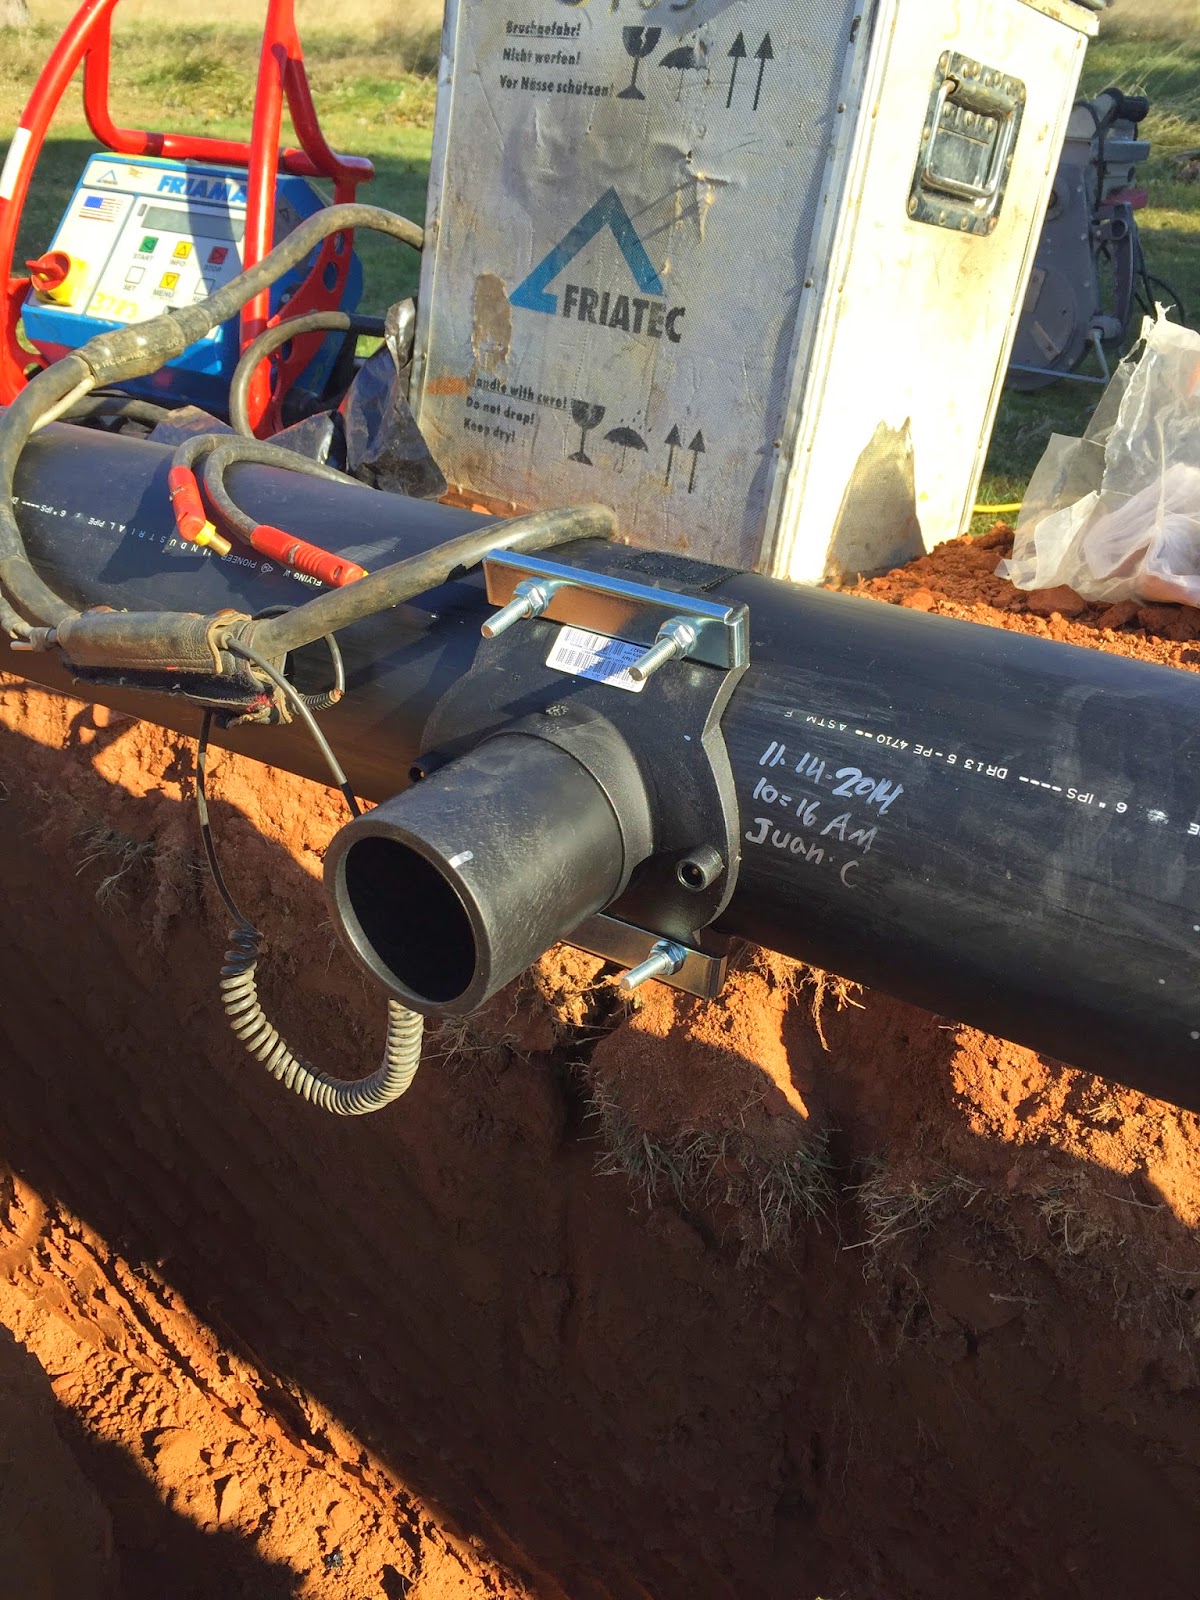
Next, the scored surface of the pipe and the surface of the fitting are cleaned using a using a lint free rag and oil free cleaner. The fitting is then placed in the location of the weld and strapped securely to the pipe.  

.
HDPE pipe is scored and cleaned.

The electrofusion saddle is then strapped securely to the pipe.

Once the fitting is strapped to the pipe, electric leads from Friamat unit are connected to the connection points on either side of the fitting.  The bar code on the fitting is then scanned, telling the Friamat Unit exactly how long the heating process must last.  Voltage is then applied to the heating coils for the specified amount of time. The built in heating coils then melt the inside of the fitting and the outside of the pipe wall, which weld together producing a very strong homogeneous joint.  After the weld is complete, the weld cools for a specified time depending on the fitting.  The weld is then signed and dated.

Leads are connected and barcode is scanned.

Welding in progress.

Completed weld is signed and dated.

When the weld is completely cooled, a special hole saw is used to remove the section of pipe in the center of the branch.  This special bit makes sure to retract the section of pipe being removed.  A small vacuum can now be used to remove any left of over filings from the drilling process.  Once all of these steps have been completed, HDPE pipe can be butt fused directly onto the end of the branch saddle.

Thursday, January 15, 2015

Keeping Golfers Informed

During any installation project on a golf course, it is important to keep golfers informed about what is going on and why.  This is especially important during the installation at Poolesville because the staff is closing a hole at a time to give Landscapes Unlimited the room they need to get the work done right while keeping golfers and workers safe. 

In order to make sure that customers are aware of everything going on, we teamed up with the staff at Poolesville to create some information boards in the Club House.  These boards include a Question and Answer section, information about the benefits of the new system, design drawings, and a section about the product being used.  The display boards also contain a QR code allowing customers to link directly to this blog if they are interested in learning more.  Poolesville's Staff are also on site and able to answer any new questions that customers have.  Taking these steps ensures that everyone is aware of what is going on and allows for a smooth and safe installation process.


Tuesday, November 4, 2014

HDPE Fusion Welding Process

One of the biggest benefits of an HDPE Piping system is that pipe can be joined with heat fusion welds. Heat fusion involves the heating of two HDPE surfaces then bringing them together to form a permanent, monolithic, leak-free system.  

Mainline HDPE pipe is delivered in 40' sticks.  40' sticks are then fused together as mainline installation progresses.  Landscapes Unlimited uses a McElroy TracStar 412 for large mainline fusions.  This unit is self contained, self propelled, and all terrain and can be used on HDPE Pipe from 4" to 12". The unit also has an on board generator for powering heater and other devices.


The 2 sections of pipe that will be fused together are lined up on either end of the McElroy TracStar 412 and clamped in to place. Each end pipe is then faced in order to produce a clean welding surface. 

Pipe facing process. 

After pipe facing is complete, Landscapes Unlimited cleans each end of pipe using a lint free rag and oil free cleaner.  They then make sure that both ends line up properly.  Heater is then cleaned using the same process.

Spraying oil-free cleaner on both ends of pipe.

Lint free rag is used to clean pipe surfaces.

After cleaning is completed, proper alignment is checked.

Both sides of heater are cleaned using oil-free cleaner and lint free rag.

After all surfaces are cleaned properly and alignment is checked, Landscaped Unlimited begins heating the heater to 425 degrees Fahrenheit .  When heater reaches desired temperature, the heater is placed between the 2 pipe ends and ends are pressed up against the heater.  Landscapes then allows the heater to heat up each end of pipe 4 minutes. The heater is then removed and pipe is pressed together.  After the weld is completed, pipe is allowed to cool 10 mins.

Heater is heated up to 425 degrees Fahrenheit.

Heater is placed between 2 ends of pipe and pipe is pressed against heater.  If you look closely, you can see beads beginning to form on pipe.


Landscapes allows pipe to heat for 4 mins.

Heater is removed, pipe is pressed together, and cooling process begins.

Completed 6" HDPE weld.  The weld is signed, dated, and time stamped by Juan.

For more information on HDPE pipe, please visit the "HDPE Pipe and Fittings" tab at the top of page.
    

Main Line Continues...

Landscapes Unlimited was able to make good headway on mainline installation last week.  After completing the mainline beween #4 and #5, Landscapes cut across #5 fairway and started working their way towards #13 green.  When crossing #5 fairway, Landscapes laid down ply-wood to prevent damage to the fairway and make for easy clean-up when back filling.

Completed Mainline between #4 and #5.

Mainline tee and gate valve in valve boxes (see previous post for picture before back filling).


Maxi-wire splice on mainline tee.  Maxi-wire splices are sleeved and placed in a 10" Round Valve box with a black lid.


6" mainline gate valve, sleeved and placed in 10" round valve box.


Plywood laid when crossing #5 Fairway to prevent damage to fairway and allow for easy backfilling and cleanup.

Completed mainline crossing of #5 Fairway.

After crossing 5 Fairway, Landscapes began work on #13 mainline.  This section of mainline was much closer to play than the section between #4 and #5, but did not have any affect on play.  

Work continues as golfers tee off on #13.

Mainline along #13 with 6"x6"x4" tee towards #12 green, 6" isolation gate valve, and 6"x3" electrofusion saddle for tee feed. 

Electrofusion Saddle for #13 tee feed.  

Soil conditions remained cooperative until Landscapes Unlimited reached the center of #13, where they began to run into some rock when trenching.  Although this slowed the process, Landscapes kept a slow and steady pace and were able to get through.

                                
Oscar San Juan of Landscapes Unlimited trenching through rocky soil on #13.

Tuesday, October 28, 2014

Mainline Installation Begins...

Before beginning work on mainline installation, Landscapes Unlimited distributes HDPE pipe to various areas of the golf course allowing them to be ready to go with pipe as they progress throughout the course.

Mainline Pipe being delivered between #4 and #5 Fairways.

Mainline pipe ready to go along #1.  

After distributing enough pipe to get started, Landscapes Unlimited began working on mainline yesterday.  They are beginning between #4 and #5 Fairway, because work will cause minimal disturbance to regular play. Trenches are dug using an Astec 960 trencher and are roughly 12" wide and 28-30" deep in this section.  They are dug at this depth to ensure that there is a minimum of 24" of cover on the 4" mainline.  Depth will be adjusted for different size pipe.

Astec 960 Trencher

Mainline trench between #4 and #5 Fairway.

After the trench is dug, Landscapes Unlimited begins laying pipe and communication wire inside the trench.  Warning tape is also laid above the pipe.  Once this is complete, they begin back filling. Back filling is done is increments of 6 inches, followed by tamping.  This process is repeated until they get back to grade.

 Mainline pipe and communication wire inside trench.  Warning tape will be laid after back filling begins.

Astec 960 slowly pushes material back into trench as workers tamp behind it.

Tamping continues.

Back to grade.

After laying a good section of 4" mainline, Landscapes Unlimited came to the first tee in the mainline. This tee is a 4x4x6 tee, with the 6" main line heading across #5 fairway towards #13 and #14.  This tee is built using a 6x6x6 butt fusion tee and 2 6x4 butt fusion reducers.  A small piece of 6" pipe and a flange adapter are also fused to the 6" tee to allow a flanged connection to a 6" gate valve.

Fusing 4" mainline to the already constructed tee.


Each weld is dated, time stamped, and signed by the person who completed the weld.

Completed tee and valve set up ready to go in the ground.

The completed tee and valve are laid in the trench and ready to be back filled.


Friday, October 24, 2014

Pre-Construction Meeting and Staking


A pre-construction meeting was held by Paul McMahon of Hydro Designs on Thursday of this week in order to bring all parties involved together before the start of the project. The plans and specifications were looked over and discussed and all questions that arose were answered.  This ensures that all parties are on the same page before construction begins.

From bottom left- Keith Miller (MCRA), Paul McMahon (HydroDesigns), Dale Downing (Landscapes Unlimited), Jon Lobenstine (MCG), Dan Hofmeister (MCG), and Oscar San Juan (Landscapes Unlimited) look over the plans at the Pre-Construction meeting.

After the conclusion of the Pre-Construction meeting, the group began staking holes 3,4,5, and 13. Using the irrigation plan as a reference, sprinkler head locations are laid out using a tape measure to make sure spacing meets what is specified on the plan.  Some variation from the plan occurs as field conditions are identified.  Each head location is discussed between Paul McMahon (consultant) and Dan Hofmeister (superintendent) to make sure that the layout of the heads will meet the golf courses irrigation needs. Locations are then marked with a color coded flag which correlates to the rotor that will be used.  

Greens Heads are laid out on #4

Approach heads on #5 are staked.

Dan Hofmeister (left) and Paul McMahon (right) discuss perimeter head location on #13 Green.

After staking is complete, Landscapes Unlimited replaces flags with "whiskers," which allow regular mowing to continue without interruption,    


Material Delivery

Materials began to arrive on site this past week.  Delivery of materials occurs in plenty of time before the planned start date, giving Landscapes Unlimited plenty of time to get materials organized and ready to go for when work begins.  The majority of materials are being stored in a storage container in the staging area near the Maintenance shop.  All HDPE pipe is stored stored in the adjacent parking lot.

Material Storage Container

Inside the Material Storage Container.

Valve boxes.

Mainline gate valves.

HDPE butt fusion fittings.


Mainline HDPE Pipe.

2" Lateral HDPE Pipe.